Post by kelabar on May 16, 2020 22:09:35 GMT 10
I've used these for a while now. Some hold heavy car parts so the design is strong. They stack well and can be stood/sat on.
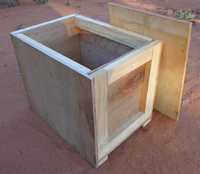
First pic:
The top and base are 12mm ply and the sides 9mm ply. All wood is 42x19.
OD ~420 x 290 x 340mm
ID ~360 x 270 x 300mm
8g treated pine screws are used and are driven in by a variable speed drill. 20mm long for attaching the 42x19 to the ply. 25 or 30mm for everything else.
Ply was cut with a circular saw.
The inset ends allow the boxes to be lifted by the top piece of wood on the ends. Very, very handy. Also using the 2 42x19 runners on the bottom means there is room enough to get fingers underneath the box for better lifting if really heavy.
The 42x19 on the inside of the sides probably isn't really needed for light items. The lid is held on by 4 screws that go into these side runners but could also be screwed into the end wood. It does make stowing items a bit more difficult but I usually overbuild!
Obviously alter the dimensions to suit whatever you want to store. These were initially to store 1.25l soft drink bottles full of rice but that's obsolete now.
Couple of points:
This is one of the first ones I built. The sides reach down to ground level. This was a mistake. If the box is slid around the sides grab and make it difficult to move. Current versions have a 2mm gap between the bottom of the side and the ground. This means the box slides only on the 42x19 runners and the sides don't catch.
I also made the lid the same size as the OD of the box. Same problem. Stacking them next to each other meant the lids could catch. Current versions have the lid about 2mm smaller all round.
I wouldn't go less than 7mm ply on the sides. This is about the minimum thickness to have enough ply for the screws to hold. Thinner ply will just have it punch off over the screw heads. Or you could use flat head nails, that'd work with thinner ply.


Second pic:
Exploded view. Only two screws are used to hold the bottom of the ends. These are driven up from underneath.
The strength in the box comes from the 5 screws that go horizontally through the bottom of the sides into the bottom runners.
They are a bit tricky to get together initially. I use a couple of 60cm squeeze grip clamps to hold things in place. This makes it much easier.
Enjoy.
First pic:
The top and base are 12mm ply and the sides 9mm ply. All wood is 42x19.
OD ~420 x 290 x 340mm
ID ~360 x 270 x 300mm
8g treated pine screws are used and are driven in by a variable speed drill. 20mm long for attaching the 42x19 to the ply. 25 or 30mm for everything else.
Ply was cut with a circular saw.
The inset ends allow the boxes to be lifted by the top piece of wood on the ends. Very, very handy. Also using the 2 42x19 runners on the bottom means there is room enough to get fingers underneath the box for better lifting if really heavy.
The 42x19 on the inside of the sides probably isn't really needed for light items. The lid is held on by 4 screws that go into these side runners but could also be screwed into the end wood. It does make stowing items a bit more difficult but I usually overbuild!
Obviously alter the dimensions to suit whatever you want to store. These were initially to store 1.25l soft drink bottles full of rice but that's obsolete now.
Couple of points:
This is one of the first ones I built. The sides reach down to ground level. This was a mistake. If the box is slid around the sides grab and make it difficult to move. Current versions have a 2mm gap between the bottom of the side and the ground. This means the box slides only on the 42x19 runners and the sides don't catch.
I also made the lid the same size as the OD of the box. Same problem. Stacking them next to each other meant the lids could catch. Current versions have the lid about 2mm smaller all round.
I wouldn't go less than 7mm ply on the sides. This is about the minimum thickness to have enough ply for the screws to hold. Thinner ply will just have it punch off over the screw heads. Or you could use flat head nails, that'd work with thinner ply.


Second pic:
Exploded view. Only two screws are used to hold the bottom of the ends. These are driven up from underneath.
The strength in the box comes from the 5 screws that go horizontally through the bottom of the sides into the bottom runners.
They are a bit tricky to get together initially. I use a couple of 60cm squeeze grip clamps to hold things in place. This makes it much easier.
Enjoy.


